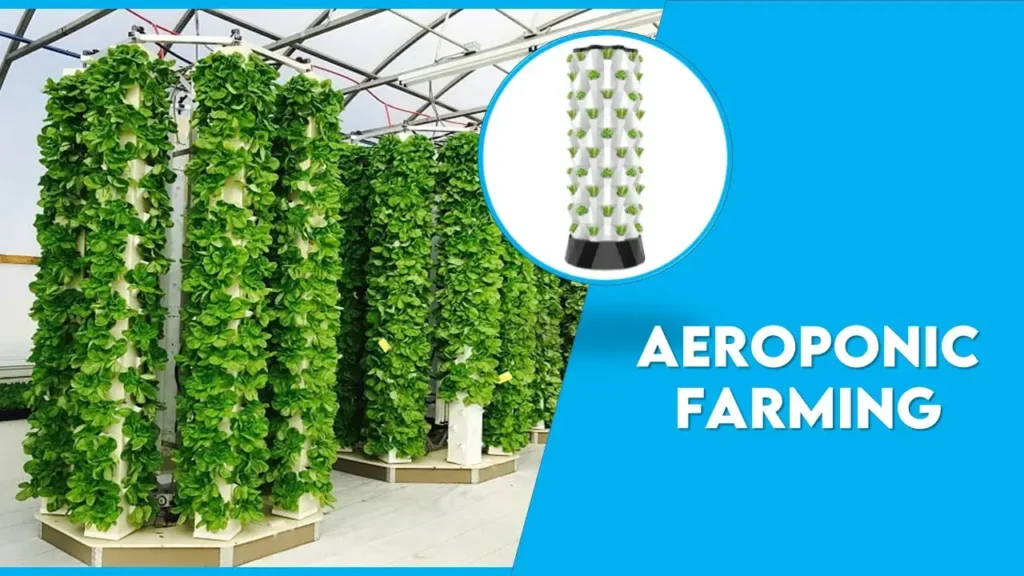
Aeroponics farming in india are most important technologies that have revolutionized farming in this decade. It is types of Hydroponics farming, One thing common about these two important technologies is that both are soil-less cultures. Imagine the reaction of our ancestors when we tell them about soil-less farming.
The technology of aeroponic farming has become immensely popular in the world. However, in India, the pace of adaptation of aeroponics could be faster. The high capital investment costs and lack of knowledge of such technologies can be cited as the main reasons. Today, we will focus on resolving the latter. We present to you the best and only guide you need to understand the basics of aeroponic farming.
What is Aeroponics Farming?
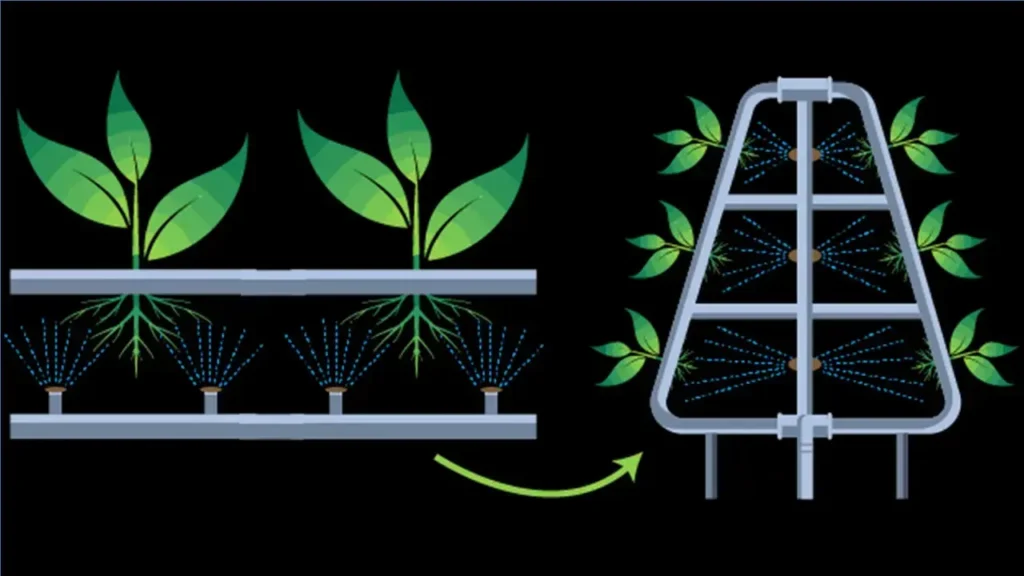
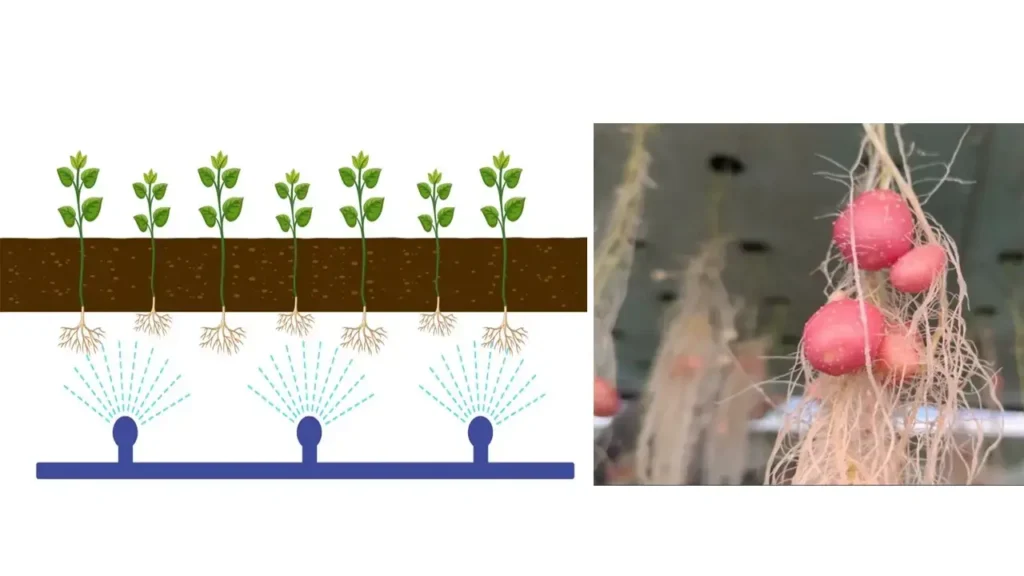
Aeroponic farming is a technique that uses air or mist to grow plants without the use of soil. In this method, the roots of the plants are suspended in air, and nutrient solution is directly sprayed to their roots. The primary advantage of aeroponics is the efficient use of water and nutrients, as the closed-loop system recirculates these resources, reducing waste.
The absence of soil eliminates soil-borne diseases and pests, which reduces the yield drastically in traditional farming methods. Additionally, because the plants are not competing for nutrients in the soil, they can be planted more densely, leading to higher yields per square foot.
How Does Aeroponic Farming Work?
Let’s imagine we’re growing a plant in the air. In aeroponic farming, we don’t use soil. Instead, we hang the plants in the air inside a special box. The roots of the plants are not in the ground, they’re dangling in the air!
Now, plants need food to grow, right? In aeroponic farming, we make a special water that’s full of plant food, or nutrients. We then spray this nutrient-rich water onto the roots hanging in the air. It’s like giving the plants a nutritious rain shower!
The best part is, that any water that doesn’t stick to the roots gets collected and used again. So, it’s like a continuous cycle of showers for the plants, which saves a lot of water!
Also, because there’s no soil, there are fewer bugs and diseases to worry about. And we can control everything – how much light the plants get, how warm it is – so the plants can grow super fast and healthy.
But remember, this needs a special box and equipment, and if they stop working, the plants can get in trouble quickly. And that’s how we can grow plants in the air with aeroponic farming!
Also Read
Advantages of Aeroponic Farming
Here are some of the key advantages of aeroponic farming:
- In aeroponics, water and nutrients are sprayed directly onto the roots of the plants.
- Since there’s no soil involved, the risk of soil-borne diseases and pests is significantly reduced.
- Plants grown aeroponically can be planted more densely as they don’t compete for nutrients in the soil.
- Aeroponic farming allows for precise control over the growing conditions, including light, temperature, and humidity.
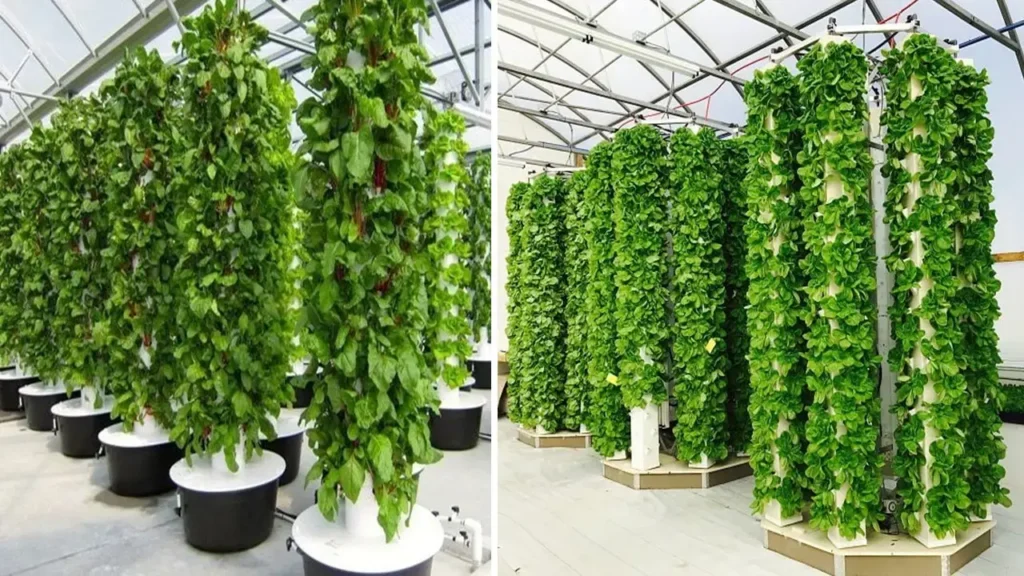
- Aeroponic systems can be stacked vertically, making them ideal for urban environments or places where space is limited.
- With optimal access to oxygen and nutrients, plants grown aeroponically often grow faster and larger than their soil-grown counterparts.
Disadvantages of Aeroponic Farming
The disadvantages are
- Setting up an aeroponic system is expensive.
- Managing an aeroponic system requires a good understanding of plant biology and system management. It’s not as simple as traditional farming and might require training.
- Since the system is heavily reliant on technology, any malfunction in the system (like pump failure or power outage) can quickly lead to the death of the plants because the roots are exposed and can dry out quickly.
- While the risk of soil-borne diseases is eliminated if a disease does occur, it can spread quickly through the misting system to all plants.
- The quality of water used in the system is crucial. Any contaminants in the water can directly affect the health of the plants.
- Not all crops are suitable for aeroponic farming. It is best suited for small, fast-growing plants, limiting the variety of crops that can be grown.
Types of Aeroponic Farming in India
The major aeroponic farming systems are
1- High-Pressure Aeroponics
It uses high-pressure pumps to create a fine mist of nutrient solution, which is sprayed directly onto the roots of the plants. These systems can be expensive to set up and maintain due to the cost of the high-pressure pumps and nozzles.
2- Low-Pressure Aeroponics
Also known as “soakaponics”, this system uses low-pressure sprayers or ultrasonic foggers to create a mist of nutrient solution.
3- Aeroponic Vertical Farming
In this system, plants are grown in vertical towers, with the roots suspended in the air inside the tower.
4- AeroSpring Aeroponics
This is a newer type of aeroponic system that combines the benefits of traditional aeroponics with the simplicity of a spring system. The nutrient solution is sprayed onto the roots from the inside of the spring, providing even coverage and excellent nutrient absorption.
5-Commercial Aeroponics
These are large-scale aeroponic systems designed for commercial production.
Also Read
How to Setup an Aeroponics Farm? Step-by-Step Guide
Step 1: Planning and Design
The planning and design phase is the foundation of your aeroponic farm. This phase involves several important steps:
- Crop Selection: The first step is to decide what crops you want to grow. Not all plants are suitable for aeroponic farming. Leafy greens, herbs, and small fruits like strawberries often do well, but root vegetables and larger fruits may be more challenging.
- Farm Layout: Next, design the layout of your farm. Consider the size and shape of your land, the location of water and power sources, and the path of the sun across the sky.
- Aeroponic System Selection: There are several types of aeroponic systems available, including high-pressure, low-pressure, and vertical systems. High-pressure systems are more efficient but also more expensive. Low-pressure systems are cheaper and easier to set up but less efficient.
- Infrastructure Planning: Finally, plan for the infrastructure you’ll need. This includes storage areas for tools and supplies, walkways for easy access to all parts of the farm, and possibly a greenhouse or indoor growing area if you’re in a harsh climate.
Step 2: Infrastructure Setup
The infrastructure of an aeroponic farm is a critical component that supports the entire operation.
- Aeroponic Systems: The heart of your farm is the aeroponic systems where your plants will grow. These systems can be purchased ready-made or custom-built depending on your needs and budget. They typically include growth chambers or towers where plants are housed, and a system for delivering the nutrient solution, often through misters or sprayers.
- Irrigation System: An efficient irrigation system is crucial for delivering the nutrient solution to your plants. This usually involves a network of pipes or tubes that connect your nutrient reservoir to the misters in your aeroponic systems.
- Lighting System: If you’re growing indoors or in a greenhouse, you’ll need to install a lighting system. This could involve LED grow lights, fluorescent lights, or HID lights, depending on your crops’ needs.
- Environmental Control Systems: Depending on your location and the crops you’re growing, you may need to install systems to control temperature and humidity.
- Power Supply: Aeroponic systems require a reliable power source to run the pumps, lights, and environmental control systems.
- Storage and Workspace: Don’t forget to plan for storage space for tools, supplies, and harvested crops. You’ll also need a workspace for tasks like seeding and transplanting.
Step 3: Preparing the Growth Medium and Planting
Preparing the growing medium for an aeroponic system involves the following steps:
- Choosing the Grow Media :In an aeroponic system, the growing medium is typically lightweight and porous to allow for optimal root exposure to the nutrient mist. Common choices include coco coir, perlite, or clay pebbles.
- Filling the Net Pots :The net pots, which hold the plants in the aeroponic system, are filled with the chosen grow media. The size of the net pots and the amount of growing media used will depend on the type and size of the plants you plan to grow.
- Planting : After filling the net pots with the growing media, you can plant your herbs, seedlings, or other desired plants. This allows the roots to absorb the necessary nutrients and water directly from the mist.
Step 4: Preparing the Nutrient Solution:
The nutrient solution is the lifeblood of an aeroponic system. The first step in preparing the nutrient solution is to choose a high-quality nutrient mix. These mixes are usually sold in concentrated form and contain a balance of primary nutrients (nitrogen, phosphorus, and potassium), secondary nutrients (calcium, magnesium, and sulfur), and trace elements (iron, manganese, zinc, copper, molybdenum, and boron).
Next, you’ll need to dilute the nutrient mix with water according to the manufacturer’s instructions.
Once your nutrient solution is prepared, it’s ready to be added to your aeroponic system. The solution is typically stored in a reservoir and delivered to the plant’s roots via a pump and misting system.
Over time, as the plants absorb nutrients, you’ll need to add more nutrient mix to the reservoir to maintain the correct concentration.
Step 5: Monitoring and Maintenance
Monitoring and maintenance are crucial steps in managing an aeroponic farming system. Here’s a detailed explanation:
- Regular monitoring of plant health, nutrient levels, and system functionality is crucial.
- Consistent temperature and humidity levels are key to the success of aeroponic systems.
- The nutrient solution used in aeroponics needs to be carefully managed.
- Regular maintenance of the system is necessary to ensure its efficiency.
- Despite the reduced risk of pests and diseases in aeroponic systems compared to traditional soil-based farming, it’s still important to monitor for signs of pests and diseases and take appropriate action when necessary.
These 5 are the steps involved in setting up an aeroponics farm.
Total Cost of Setting Up an Aeroponics Farm
The total cost of setting up an aeroponic farm in 1 acre is detailed below
Here’s a detailed breakdown of the costs involved in setting up an aeroponic vegetable farm in a 1-acre area:
- Infrastructure : The infrastructure for an aeroponic farm includes LED lights, pumps, misting nozzles, hydroponic net pots, and other necessary equipment. The cost of these can vary greatly depending on the specific requirements of your farm. Based on various sources, the estimated cost for this can range from INR 50,00,000 to 2,00,00,000
- Land Preparation : This includes the cost of preparing the land for the aeroponic system, such as leveling the land, installing drainage systems, and setting up the aeroponic system. The cost for this stage can range from INR 5,000 to INR 15,000 per acre.
- Planting Material : The cost of the seeds or seedlings for the vegetables you plan to grow. Depending on the chosen crops and their availability, this expense may vary. On average, the budget is approximately Rs 20,000 to Rs 50,000 for planting materials.
- Nutrient Solution : The nutrient solution used in aeroponics needs to be carefully managed. This includes ensuring the solution has the right balance of nutrients and maintaining the correct pH level. While the cost of formulating a nutrient solution depends on factors such as crop type, required minerals, and solution stability, allocate around Rs 40,000 to Rs 70,000 for nutrient supplies.
- Maintenance and Operation Costs : These include the cost of electricity, water, labor, and other operational costs. According to recent statistical information, the average annual cost of equipment and infrastructure maintenance in the aeroponic urban farming industry is approximately INR 5,00,000 to 10,00,000.
- Marketing and Sales : This includes the cost of packaging, transportation, and marketing your produce. The cost for this can vary greatly depending on your specific marketing and sales strategies.
So the total cost of setting up and running an aeroponics farm comes to around Rs 60 lakhs to Rs 2.2 crore approximately. This will vary based on the land, type of material used, market prices, etc.
Also Read :
Aeroponics Farming at Home
Setting up your aeroponic system at home might sound complicated, but it’s quite feasible. Here are the basic steps for making a DIY aeroponic system:
- A-frames
These are used to suspend the crown (the plant’s top) and roots (the plant’s bottom) from the ground. This way, the crown develops forward, and the roots go downwards spontaneously, without the need for soil.
- Nutrient Solution
Farmers or gardeners then apply a solution that is rich in nutrients and water to the plants, allowing them to thrive. In an aeroponic system, all of the nutrient mix is reused within the system.
- Harvesting
Harvesting becomes significantly easier because the method allows for high-density planting. Notice how much money you’ll make through this technique.
With the help of aeroponics, many urban gardeners have found ways to cultivate a variety of high-yielding herbs, vegetables, and fruits in their homes without having to leave their flats. Aeroponic towers are also available, which let you grow 30 times more vegetables in small spaces, suitable for small apartment balconies in large cities.

Aeroponic Farming vs Hydroponic Farming
Here’s a comparison of Aeroponic Farming vs Hydroponic Farming :
| Aspect | Aeroponic Farming | Hydroponic Farming |
| Definition | Aeroponics is a method where plants are grown in a mist or fog environment, with the roots suspended in the air. | Hydroponics is a method where plants are grown in nutrient-enriched water, eliminating the need for soil. |
| Cost | Aeroponic systems tend to be more expensive to build due to the specialized equipment needed. | Hydroponic systems tend to be cheaper to build and easier to manage. |
| Resource Usage | Aeroponics uses less resources and tends to produce a better harvest. | Hydroponics requires more water as plants are submerged in a liquid nutrient solution. |
| Yield | Aeroponics offers faster plant growth, higher yields, and the ability to grow a broader range of crops. | Hydroponics allows higher density planting and 3-13x higher yields per area than soil farming. |
| Risk | Any lapse in aeroponic systems can rapidly kill crops. | Hydroponics has high energy demands and startup costs. |
| Maintenance | Aeroponics requires regular monitoring and maintenance of the system. | Hydroponics also requires regular monitoring and maintenance, but it’s generally easier to manage. |
Top 5 Aeroponic Farming Companies
Here are the top 5 aeroponic farming companies in India:
1- AeroFarms
This company has won many awards for its operations and uses its patented “aeroponic technology” to take indoor vertical farming to a new level of productivity with minimal environmental impact. AeroFarms uses proprietary aeroponics for better production and is a provider of soilless farming systems.
2- Plenty
Plenty is a vertical farming company that offers salads and vegetables. It grows its plants in tall towers inside a climate-controlled facility with LED lights.
3- UrbanKisaan
UrbanKisaan specializes in hydroponic methods of farming, which is a subset of hydroculture and is a method of growing plants without soil, using mineral nutrient solutions in a water solvent.
4- Future Farms
Future Farms focuses on the challenging areas of hydroponic farming, including the development of a domestically designed, low-cost hydroponic system that can grow pesticide-free vegetables and herbs.
5- Triton Foodworks
Triton Foodworks is another company that has made significant strides in the field of hydroponic farming.
Also Read
Conclusion
Aeroponics refers to the technology of growing plants using air or mist without the use of soil. It is done with the help of media like coco peat, perlite, etc., and using nutrient solutions. Aeroponic farming is done in controlled environments inside greenhouses or other protected structures where temperature and humidity are controlled. Due to this aeroponic farming requires very high initial investment costs. But that investment will be worth it. Aeroponics farming produces higher yields and the produce will be of high quality which can fetch premium prices. So if you are someone looking to start aeroponic farming, you should not think twice.
Latest Post
- April 2026 – Times of Agriculture Magazine

- Escorts Kubota expands Digitrac lineup, unveils three new tractor models
- TAFE’s JFarm inaugurated in Rajasthan to empower the farming community
- March 2026 – Times of Agriculture Magazine
- Design Perfect Sales Posters with AI Background Generator Assistance

- February 2026 – Times of Agriculture Magazine
- January Issue 2026- Times of Agriculture Magazine
- Top 10 Agricultural Drone Companies in India
- December Issue 2025- Times of Agriculture Magazine