What’s special about Hydrangeas? Simple, everyone wants more of them. Hydrangeas are very popular among gardeners. They are so attractive that everyone who sees them in your garden asks for stem cutting so that they can also grow them in their gardens. This huge demand for this flower can only be met by vegetative propagation.
But what is the right method to propagate Hydrangeas? Is stem cuttings the best method to propagate hydrangeas? How to grow Hydrangeas from cuttings?
We understand that these might be the questions floating in everyone’s minds about the propagation of Hydrangeas. That is why we have come up with this article to clear everyone’s doubts. So, I suggest you read this article from top to bottom to understand the A-Z about How to propagate Hydrangeas from cuttings.
Hydrangeas: Basic Information
Hydrangeas, also known as Hortensia, are some of the most iconic blooms in the world, adored by many plant enthusiasts. Originating from Asia and the Americas, they have been around for over 45 million years, nearly as old as dinosaurs!
The name ‘Hydrangea’ comes from Greek descent: “Hydro” means water and “angos” means jar or vessel. Alkaline soils produce pink flowers, while acidic soils give rise to blue ones.
In Japan, they are seen as a sign of gratitude, while Victorians associate them with boastfulness or vanity. Each color also carries a meaning: Pink represents love and sincerity, Blue symbolizes forgiveness, White denotes boasting or bragging, and Purple signifies abundance and understanding.
Basic Tools Required for the Propagation
- Garden Scissors or Pruning Shears: These are used to make clean cuts on the Hydrangea plant to obtain the cuttings.
- Clean Cutting Board or Surface: This is needed to prepare the cuttings and apply the rooting hormone.
- Clean Water: This is used to keep the cuttings hydrated until they are ready to be placed in the medium.
- Rooting Hormone Powder or Gel: This helps stimulate root growth when applied to the cut end of the cutting.
- Quality Propagating Mix: This is the medium in which the cuttings will be placed to the root. It should be well-draining to avoid rotting the stems but retain enough moisture to promote root growth.
- Clean Plastic Pots: These are used to hold the propagating mix and the cuttings.
- Coconut Coir and River Sand (or alternatives): A combination of equal parts coconut coir and river sand is ideal for any softwood or hardwood propagation. The coconut coir retains moisture while the sand improves drainage. You can replace coconut coir with peat moss if you already have some available, and river sand with perlite or another material that improves drainage.
Steps for the Propagation of Hydrangeas From Cuttings
Various steps involved in the propagation of Hydrangeas from cuttings are
- Cutting Selection
- Leaf Removal
- Preparation of Additional Cuttings
- Container and Medium Preparation
- Medium Moistening
- Rooting Hormone Application
- Insertion of Cutting into Medium
- Covering and Placement of Container
- Medium Moisture Check
- Waiting Period for Root Development
- Transplantation to Pots
- Final Planting
Now let us explain each step in detail
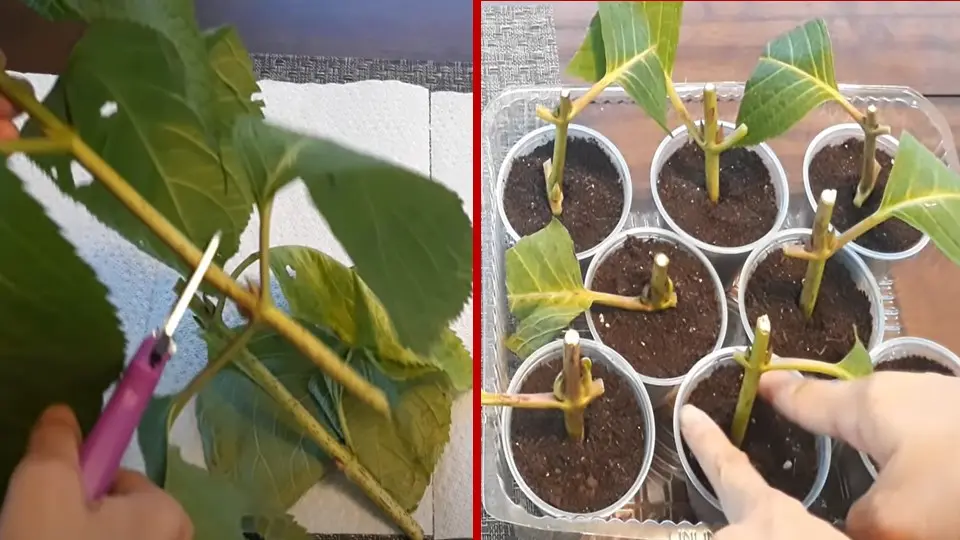
1. Selection of Cuttings
The process includes
Identify the Right Stem: Start by identifying a healthy Hydrangea plant. It’s best to select a stem from the current season’s growth as they are more likely to root successfully.
Non-Flowering Shoots: Choose a non-flowering shoot for your cutting.
Length of the Cutting: The cutting should ideally be about 5 to 6 inches long. This length is generally sufficient to include several nodes (the bumps on the stem where leaves attach), which are the points from which the roots will grow.
Time of the Day: It’s best to select your Hydrangea cutting in the morning when the plant is fully hydrated. This helps to reduce the stress on the cutting when it’s removed from the parent plant.
Number of Nodes: Ensure that your cutting has at least two nodes. The lower node will go into the soil and will be the point from which the roots grow, while the upper node will give rise to the new leaves.
Avoid Flowering Stems: As tempting as it might be to choose a stem with a beautiful bloom, it’s best to avoid flowering stems. The energy that the cutting needs to develop roots might instead go into maintaining the flower, reducing the chances of successful rooting.
2. Leaf Removal
The leaf removal step in the propagation of Hydrangeas from stem cuttings is a crucial part of the process. Here’s a detailed explanation:
Why Remove Leaves?: The purpose of removing leaves from the cutting is to reduce water loss and direct the cutting’s energy towards root development. Leaves lose water through a process called transpiration.
Which Leaves to Remove?: Start by removing all the leaves from the lower half of the cutting.
How to Remove Leaves?: Pull downwards, and the leaf should come away cleanly. Be careful not to damage the stem in the process.
What About the Top Leaves?: For the leaves at the top of the cutting, you don’t need to remove them completely. Instead, cut them in half. This will still reduce water loss but also leave some leaf area for photosynthesis.
Final Check: Once you’ve removed and trimmed the leaves, check the cutting over. It should have one or two pairs of halved leaves at the top, and the rest of the stem should be bare. Now the cutting is ready for the next step in the propagation process.
3. Preparation of Additional Cuttings
Selection of Additional Cuttings: After you’ve successfully prepared your first cutting, it’s time to prepare additional ones. The process remains the same: select healthy, non-flowering shoots from the Hydrangea plant. Remember, the healthier the stem, the higher the chances of successful propagation.
Consistency in Length: Try to maintain consistency in the length of the cuttings. A length of about 5 to 6 inches is generally recommended.
Preparation Process: The preparation process for additional cuttings is the same as the first one. Remove the lower leaves, cut the top ones in half, and make a clean cut just below a leaf node.
Number of Cuttings: It’s always a good idea to prepare a few extra cuttings to account for any that might not root successfully.
Storage: If you’re not planting the cuttings immediately, store them in a cool place and keep them moist. A plastic bag with a damp paper towel works well for short-term storage.
Also Read
4. Container and Medium Preparation
Container Selection: Choose a container with drainage holes to prevent waterlogging. The size of the container depends on the number of cuttings you plan to propagate. Each cutting needs enough space to develop roots without competition from others.
Medium Preparation: The medium in which you plant your cuttings should be well-draining yet able to retain enough moisture to encourage root growth. A combination of equal parts perlite and peat moss is often used.
Moistening the Medium: Before planting the cuttings, moisten the medium. It should be damp but not waterlogged. Overwatering can cause the cuttings to rot while underwatering can dry them out.
Filling the Container: Fill the container with a moist medium. Leave a little space at the top to make watering easier and prevent spillage.
Making Planting Holes: Make holes in the medium for the cuttings. The holes should be deep enough to accommodate the cuttings and the nodes that will produce roots.
5. Medium Moistening
Why Moistening the Medium?: The purpose of moistening the medium is to provide the cuttings with the necessary moisture they need to develop roots.
How to Moisten the Medium?: To moisten the medium, you can add water and mix it thoroughly until the medium is evenly damp. Overwatering can lead to rotting of the cuttings, while underwatering can cause them to dry out.
Checking the Moisture Level: After adding water, check the moisture level of the medium. A good way to do this is to squeeze a handful of the medium. It should hold together but not drip water. If it’s too dry, add more water. If it’s too wet, you can add more medium to balance it out.
Maintaining Moisture: Once the cuttings are planted, it’s important to maintain the moisture level in the medium. This can be done by watering the cuttings regularly but make sure not to overwater.
6. Rooting Hormone Application
Why Use Rooting Hormone?: Rooting hormone, available in powder or gel form, helps stimulate root growth in cuttings.
How to Apply Rooting Hormone?: After preparing your cutting, dip the cut end into the rooting hormone. Ensure that the area where you expect the roots to form is well covered. Shake off any excess hormone as too much can inhibit root growth.
Safety Precautions: Handle rooting hormone with care. Avoid inhalation and skin contact, and always wash your hands after use. Keep it out of reach of children and pets.
7. Insertion of Cutting into Medium
Creating a Planting Hole: Start by making a hole in the medium for the cutting. The hole should be deep enough to accommodate the cutting and the nodes that will produce roots. You can use your finger or a pencil to make this hole.
Inserting the Cutting: Next, insert the cutting into the hole you’ve made in the medium. The end of the cutting that has been dipped in rooting hormone should be the end that goes into the hole. Be careful not to rub off the rooting hormone while inserting the cutting.
Positioning the Cutting: The cutting should be positioned so that the nodes where you expect roots to form are covered by the medium. However, the leaves on the cutting should remain above the surface of the medium.
Securing the Cutting: Once the cutting is in place, gently firm the medium around the base of the cutting. This helps to hold the cutting upright and ensures good contact between the cutting and the medium.
Spacing the Cuttings: If you’re planting multiple cuttings, make sure to leave enough space between them.
8. Covering
Covering the Container: After planting the cuttings, cover the container with a clear plastic bag or wrap. This creates a mini greenhouse effect, maintaining a high humidity environment around the cuttings which is crucial for their survival and growth. The cover should be loose enough to allow air circulation and should not touch the leaves to prevent rot.
Placement of the Container: Place the covered container in a location with bright, indirect light. Direct sunlight can cause the cuttings to dry out and perish. The ideal temperature for Hydrangea cuttings to root is between 70-75 degrees Fahrenheit.
Monitoring the Environment: Regularly check the container to ensure that the medium remains moist and the cuttings are not wilting. If condensation forms inside the bag, open it for a few hours to release excess moisture.
9. Medium Moisture Check
When you propagate hydrangeas from stem cuttings, you place them in a growing medium, which could be a potting mix or sand.
Now, the medium moisture check step is all about ensuring that this growing medium has the right amount of water. It should be moist, but not waterlogged. Too much water can cause the cuttings to rot, while too little can cause them to dry out and die.
Here’s a simple way to check the moisture level: Insert your finger about an inch into the medium. If it feels dry at that depth, it’s time to water. If it feels wet, wait a day or two before checking again. Remember, the goal is to keep the medium consistently moist.
This step is important because hydrangeas, like many plants, need a balance of air and water in their root zone to grow properly.
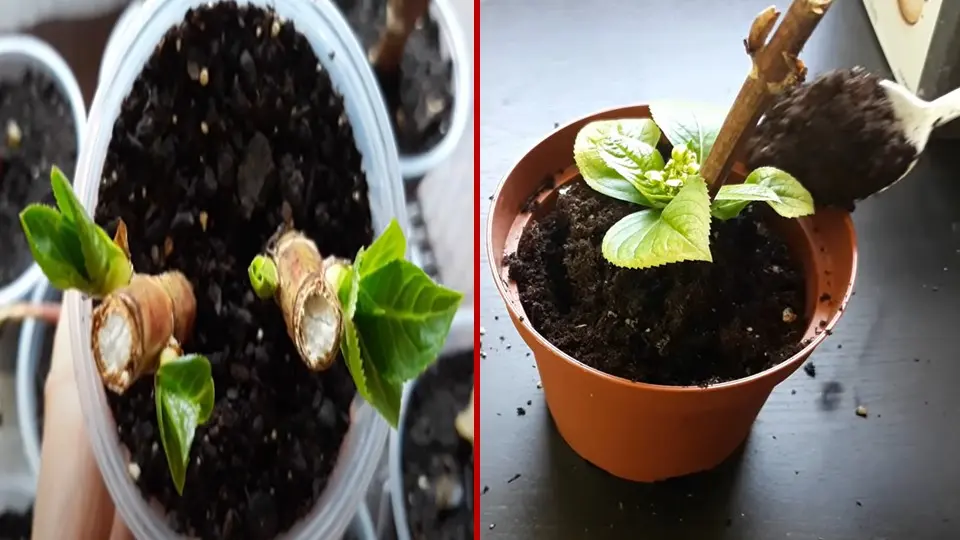
10. Waiting Period for Root Development
After you’ve planted your hydrangea cuttings in the moist growing medium and placed them in a suitable environment, it’s time to wait for the roots to develop.
The waiting period can vary, but generally, hydrangea cuttings start to develop roots anywhere from 2 to 6 weeks. Keep the growing medium moist and ensure the cuttings are in a warm place with indirect light.
You might be tempted to check for roots frequently, but it’s best to resist this urge. Disturbing the cuttings can damage the delicate new roots. A good sign that roots are developing is new leaf growth on the cutting.
After about 6 weeks, you can gently tug on the cuttings. If there’s resistance, roots have likely formed. At this point, you can transplant the new hydrangea plants into larger pots or directly into your garden, depending on the season and your climate.
11. Transplanting to Pots
Once your hydrangea cuttings have developed roots, which usually take about 2 to 6 weeks, it’s time to transplant them into pots. This is an exciting step as it means your cuttings are well on their way to becoming full-grown plants!
Choose a pot that’s large enough for the new root system. Fill it with a good quality potting mix, which provides the nutrients your hydrangea needs to continue growing. Make a hole in the center of the potting mix, place your cutting in it, and gently cover the roots with the mix.
After transplanting, water the plant thoroughly. Place the pot in a location with indirect sunlight and continue to keep the soil moist. In a few weeks, your hydrangea cutting should start to grow new leaves, indicating that it’s adjusting well to its new home.
12. Final Planting
This is the final step in the propagation process.
Choose a spot in your garden that gets morning sun and afternoon shade, as hydrangeas prefer this type of light. Dig a hole that’s twice as wide and just as deep as the pot. Carefully remove the hydrangea from the pot, place it in the hole, and fill the hole with soil.
Water the plant thoroughly after planting. Hydrangeas need a lot of water, especially in the first few weeks after planting. Continue to water regularly, keeping the soil moist but not waterlogged. In a few months, your propagated hydrangeas should start to bloom, adding beauty to your garden.
Also Read
- Flowering Trees in India: Flower Tree for Home
- 13 Different Types of Money Plant for Wealth and Good Vibes
Conclusion
There are a plethora of flowers of different colors, sizes, and shapes but none can substitute Hydrangeas. Every person owning Hydraneas in his/her garden knows the number of people who ask them for their cuttings so that they can propagate. However many don’t know the right way to propagate and this results in growth failures. That is why knowing the right scientific way of propagation is important.
In this article, we have discussed How to grow Hydrangeas from cuttings. We have discussed a step-by-step process of the procedure. You should carefully read and understand each step and practice them. There is a high chance that many of your initial tries will result in failures.
Latest Post
- Benefits of Rainwater Harvesting: Amazing Way to Save Water

- How to Grow Hydrangeas From Cuttings? The Best Answer

- How to Grow Cinnamon Plant

- June Issue : Times of Agriculture Magazine (Bitter truth of Mango)

- Solar Irrigation System: A Great Irrigation Technique

- Bamboo Drip Irrigation System in India : a unique Setup
- Dairy Farming in India: An Amazing Business Idea

- How to Propagate String of Pearls? 2 Best Method for You
- How to Grow Money Plant in Water: Magical Tips for You